We continue our series of guides on how to create tokens on different blockchains and today we will focus on NEM (XEM), which has been recently rebranded and is now called Symbol.
What is NEM?
Before starting, it is worth providing some information about this blockchain.
Launched in 2015, NEM is an acronym that stands for New Economy Movement and one of its peculiarities is that it was written using the Java programming language.
Its mainnet supports multiple ledgers and has a Smart Asset system, while the NEM nodes invoke the relevant APIs.
As a consensus protocol, NEM uses PoI (Proof of Importance) and this importance of blockchain users is determined by the number of XEM held and the number of transactions associated with an address.
NEM also has a P2P cryptographic system, multi-signature accounts and an Eigentrust++ reputation system.
As with most blockchains, there are several ways to create a token and today we will focus on the one that uses one of the wallets dedicated to this purpose, the NEM Nano Wallet.
To create a token we’ll need at least 115 XEM to proceed with the operation.
It should be remembered that there is a fee system on this blockchain, so it is better to take that aspect into account when evaluating the required tokens.
Note: the token in this guide was created only for the purpose of writing the article. It will not be used or listed. Any Cryptonomist or Cryppo tokens found on the market are fake.
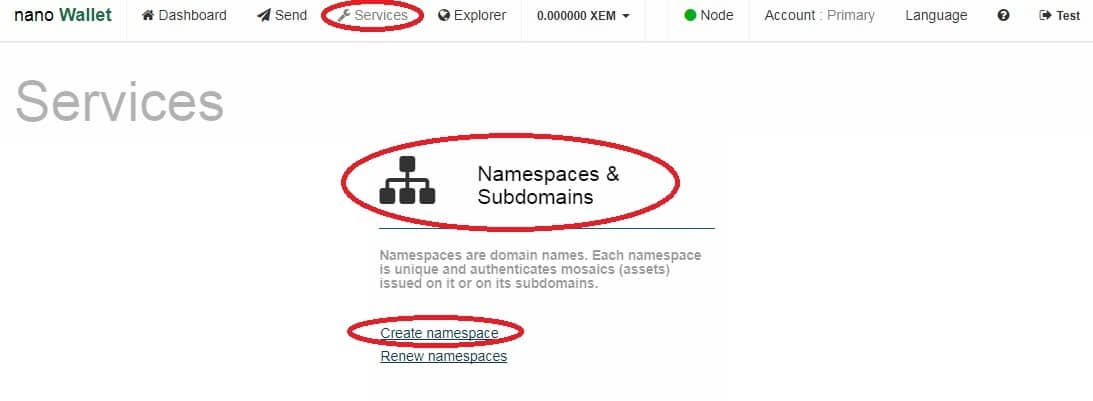
First of all, we have to open our wallet and click on the “Service” menu where we have to select “Create Namespace” from the “Namespace & Subdomains” tab.

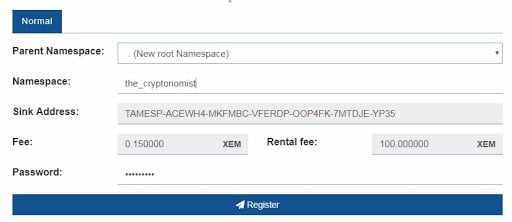
In the next screenshot, we will have to create our namespace, i.e. a dedicated area on this blockchain and its cost will be used to pay for space on the blockchain for a whole year.
Only letters and numbers can be entered, all in lowercase, and the only special characters allowed are “_” and “-” as spaces are forbidden.
Afterwards, press the “Register” button:

Now that we have our dedicated space we have to create the actual token, so we go back to the “Service” menu and select the “Mosaics” tab and press “Create Mosaic”.
Here the various parameters of our token such as the ticker, the description, the supply (maximum divisible by 6 decimals), whether it is transferable or not and also an interesting parameter that is the “Requires Levy”, which allows collecting the fees of the transactions related to the token.
After completing all the fields just press “Send” and the transaction will be completed in a few minutes, with a cost of 10 XEM plus 0.15 fee. The result can be viewed here.
So in a few minutes and with just under 5 dollars, considering that XEM is traded at about $0.042, we created our token which is ready to be distributed or used for an ICO (Initial Coin Offering).


