


Libra is the new cryptocurrency of Facebook while Move is the programming language with which the source code was written, and by using the GitHub repository it is possible to create a CLI Client, one or more wallets and send tokens by connecting to the testnet.
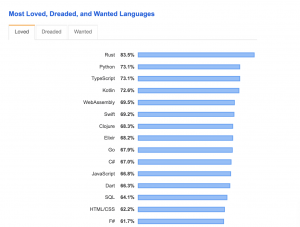
Move, in turn, was written in Rust, what is now defined as the programming language most loved by developers.
Since Libra’s goal is to be a token that can be used by billions of people every day, Move has been designed as a safe, reliable and fast programming language.
Requirements for the installation of Libra Core
In order to be able to install a node correctly and carry out all the basic operations, these requirements must be met:
- Use of a Linux system (Red Hat or Debian) or macOS;
- Stable Internet connection;
- Homebrew installed (if you use macOS);
- Git installed;
- Yum or apt-get installed (if using Linux);
Initially, the repository must be cloned from GitHub:
git clone https://github.com/libra/libra.git
And to run the Libra Core it is necessary to navigate to the directory:
cd Libra
./scripts/dev_setup.sh
This action installs several components:
- Rustup, an installer for Rust;
- Rust-toolchain;
- CMake, which may take a few minutes to install;
- Protoc, a compiler;
- Go.
Creating the CLI Client and connecting to the Testnet
After the process has been executed and successfully completed, the CLI Client must be created and connected to the testnet.
To connect to a validator node on the Testnet it is necessary to run this command:
./scripts/cli/start_cli_testnet.sh
Once the process is finished, the following output will be shown. If ‘Connected to the validator’ appears, it means that everything went well.
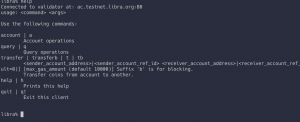
If it is desired to interrupt the operation of the node, it is sufficient to execute the above-mentioned quit command.
Creating a Libra wallet
The command is very simple: libra% account create
The public address is thus returned if everything goes well. If this is the first one being created, #0 will appear next to the address, indicating the first address. If the command is repeated several times the number after the asterisk will increase.
Transactions
In this case, it is necessary to create another wallet, to which the Libra tokens will be sent.
libra% account create
A different public address is obtained, but remembering them all is rather annoying.
The account list command returns the entire list of addresses.
Adding tokens to the wallet
With the following command it is possible to add tokens to the wallet:
libra% account mint 0 500
The 0 is simply the wallet index. In this case two of them have been created, the first one will have index #0, the second one will have index #1. 500 shows the amount of Libra tokens to be added to the wallet.
Checking the balance of the wallet
To see the amount of tokens that are present in the wallet, at index 0, just execute libra% query balance 0
Making a transaction
Here is how to send 100 Libra from address #0 to address #1 libra% transfer 0 1 100
If the query balance command is executed again, the updated balance will be shown. The tokens were successfully sent and received.

